Saturday, 20 August 2016

Goodbye to our tradespeople

I can honestly say I had a great time painting the outside of the house last Sunday. Early start, a couple of half-hour breaks, finally finished just before darkness fell at 6ish. Step back, admire the effect, exhausted but feeling very impressed with your work.

Of course, I had taken the glory job. It was only made possible by Jo taking the hit, spending endless hours (and probably more time than it took to do the top coats) in the tedious and distinctly unglamorous tasks of preparation - filling, sanding, priming, etc. Jo, we (I) salute you.

Jo actually getting to paint the outside rather than repairing it


The builders took the existing windows and and refurbished them to meet regulations and to double glaze them. Some of the windows had sills which looked a bit worse for wear - they needed preparing and painting.

The existing sill of what is now the apartment 
bedroom window. 
A few layers of thick exterior paint needed to be
scraped off the sills
Ready for priming and painting


Inside the apartment, Jo continued to work on the inside of the front door. White paint on woodwork always seems to need quite a few coats, maybe someone can tell us if we're doing it right!? I seem to remember the hallway upstairs needed 3 coats before it looked like white, and this door has also needed the same. 

Note the switchboard on the left hiding circuits for Africa. We'd be very surprised if the fuses ever trip in this apartment.  

We have reached the major milestone of the tradespeople finishing what they need to do. It does feel like a fairly large psychological step to make. When you're in the middle of it, and there's all these different people involved, and the invoices keep rolling in - the finish line feels a long way away. Well, now everyone's gone and there's only one invoice left to come in. 

Funnily enough, last night Jo bumped into the builder Nathan in the Southern Cross bar down the road from the house. So even when they're not in our house they're nearby. That's comforting (or is it?)

Carpets have been fitted and in the distance you can see the tiled splashback in the kitchen. 


Bedroom carpet fitted and interior sash windows painted and looking beautiful. A view of the garden through the window. 
View through to the bedroom from the living area. Note the different shade of white used for the door frames and skirting


Look around most rental apartments and you'll see the same white ceiling, white walls, white doors, white windows, white skirtings. Understandable because it's much easier to paint. You can see from our painting that we didn't exactly make it easy for ourselves. We've used very different colours on the different surfaces. Even where it looks white with white, its actually different shades of white. We did have a financial reason - we had a large amount of paint left over from painting upstairs so it didn't make sense to buy a whole lot of new paint. But, even if we hadn't used the paint from upstairs, I'm sure we still would have wanted to paint it in this manner. It's just the type of people we are. And clearly, the features such as the brick chimney and the nice windows deserve to be picked out in a colour. (We'd better check with Jo on that one though, she did all the edging not me!)
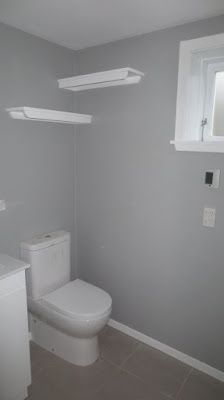

Shelves in the airing cupboard.
"But what's left then?" I hear you cry! The main things are:

  • a bit of painting of frames and little touchups
  • I think the plan is to paint the front door 
  • fitting handles to drawers and cupboards in the kitchen, and to a few windows
  • installing blinds,
  • working on the brick path to reinstate it where it was taken up and extend it to the apartment front door. 
  • buying a fridge and washer/dryer. 
  • And of course there is the council inspection! 
We will keep you posted.

Monday, 8 August 2016

Getting creative with paints and pipes

The last blog post was a bit of a digression into the wonderful world of flatpack furniture. In this post we return to the wonderful world of our ground floor apartment. Before we check out how the interior is going, a quick look at the exterior

As you know, council regulations stipulate specially-lined awnings over the windows to protect the upstairs from any fire that breaks out downstairs. This had to include an awning over the front door. After a bit of a discussion with the builders and architect, we all agreed that we could tweak the awning over the door to make it more 'porch' style. It does the fire awning job and helps to frame up the nice panelled door.

So to the inside. We had got to the stage where things had been plastered, so it was time to paint! We have some lovely friends who came over to help us - thanks Aideen, Gary, Rob and Roger.

Gary and Aideen capture the true spirit of painting. 
Steve and Rob working hard
Jo the only person to be photographed actually painting

In the living area:

The kitchen tiled and painted...
...then with the celebrated furniture from the previous post in position. It looks kind of pink in this photo, but it isn't.
The brick chimney feature looking resplendent in Summer Horizon blue.
The TV nook is still the builders' shelf, but a painted builders' shelf at least. The heatpump was supposed to be mounted on the wall next to the front door with the external unit sitting on the ground at the back of the house. But the pipe to the outside unit would have meant a large hole in the external frame of a nice window. So Don and Jez from Arctic Spark, the heatpump installers, installed the heatpump on the back wall, took the pipe out the back of the apartment, routed it up and along to the external unit now sitting down the right hand alley of the house. To get the fall they needed for the moisture created by the heatpump, they took a pipe down to the floor drain at the bottom left hand corner of the back of the house. It took a bit of thinking to get there and it was quite lucky this was a Saturday so we were there to tell them what we did and didn't like. The actual result was much preferred to our original plan. 


The heatpump installers ran the pipe to the external unit along the back of the apartment and out to the outside wall of the house. Right hand wall in this photo is the outside of the left hand wall in the apartment. Notice the pipe for draining the moisture on the left hand wall here running down to the drain in the left hand corner of the back of the house. There was a flight of stairs in the basement which in times gone by was connected to the upstairs by a big hole in the floor - this hole had been boarded up when we bought the house. The builders shifted the stairs so we can we can still get up on to the rock and the underside of the house.

Tiled entrance for those wet shoes and brollies

In the bedroom:


Bedroom wall, where the head of the bed will go, now painted and rocking light and power

In the bathroom:

Jo laid out the wire for the underfloor heating in the bathroom
Bathroom painted, tiled and now the frosted glass is in!

Light and power:

You will have noticed the lights and plug sockets in the photos above, and the electrician has been hard at work wiring everything up to a new power board located on the right hand side of the house. It has two electrical meters, one for the house and one for the apartment. We have to make a special mention to Tony the electrician here. As you will have read above, we had to relocate the heatpump and that meant it wasn't going to be where Tony had planned a power connection for it. However, the way Tony had wired it meant that there was a complete circuit for it in it's new location, rather than having to add it to, and maxing out, an existing circuit. Don the heatpump installer was very impressed by what Tony had done - and it is not often that tradies complement other tradies' work, so when they do you know it's good!

Saturday, 30 July 2016

The fun you can have by saving money

Having money is great. If you have lots of money, you can get people to do everything for you. You don't have to cook, you don't have to clean, you don't have to put together flat pack furniture. But there is a problem with that. And that is you miss out on life's little hidden treasures. 

When we did our kitchen a few years ago, we had quite a large budget. One of things we paid someone else to do was to make and fit our kitchen. So we had some sessions with a kitchen designer who did a design on the computer. Then we were invited to the workshop and gazed over the workshop floor as a computer took our designs and cut it all out. The kitchen was then delivered, put together on site and put in place. We then proceeded to use our lovely new kitchen. 

With the apartment, money is a bit of an issue. Got to get the best bang for the buck. This meant a flatpack kitchen from the DIY store. There are some flatpack kitchens where all the bits are actually on the shelves in the DIY store and you put them on your trolley and take them home. Because we could get a discount on a certain DIY store, their approach was actually they would deliver the bits to you. But in essence what we had was our kitchen in boxes for us to put together. 

I approached this with a bit of trepidation. I had made flat pack furniture before and could never quite get things like door hinges to play nicely. So I was waiting nervously for that moment to come when we couldn't get the door hinges to work and had doors handing at weird angles. And soft close drawers, how were they ever going to work. 

It was the kind of task that could be done multitasked, we thought. So we assembled all the boxes in the living room, and put on a DVD. The awful 50 First Dates with Adam Sandler. Honestly, the flat pack furniture was more entertaining as it turned out. 

I won't go into the minutiae but here were my observations:

  • It was FUN. I found myself saying to anyone who would listen that I actually thought putting flat pack furniture together for a living would be great. And I do mean that, if anyone wants to offer me a job doing it, I would take it. It's fun because the instructions define the goal that you will reach if you follow said instructions. Unlike so much of life (eg work) where you have no idea of what the goal is or the steps to get there. and then when you do eventually work out the goal and the steps, its not the goal you wanted to be part of. The instructions for a set of drawers describe a set of drawers. I want a set of drawers. I follow the instructions. I get a set of drawers. I am happy. I am having fun. 
  • Civilisation has come along a way with the flat pack product. I was actually quite surprised how well everything went together. That side and that side fitted together snugly. That corner is actually a right angle. We had to unscrew some bits but they did actually go together again when rescrewed. Things weighed a tonne when put together, got to be a good sign. And the finish of the doors wasn't too shabby. It was almost as if however bad a job you did, it would still look ok, in other words idiot proof. 
Flat pack furniture actually looks half decent
  • It's hands-on problem solving for people who don't ever get to do it. Most jobs are management jobs now. That means you define the problem, or someone tells you the problem, and you have to organise the people who can fix the problem. You give them a hard time/encouragement until the problem is fixed or until everyone can clearly see the problem is not going to get fixed and so you all move onto the next one. With flat pack furniture, if you've got a problem, you have to fix it. With your own two hands. And you can't ignore it or you don't have anywhere to put your plates, cups, etc. Except on the ground which will look great to dinner party guests. For us, it wasn't too clear from the instructions how the soft close drawer runner worked, and we screwed them on and found out that was wrong, so we tried another way which seemed very difficult but was the right way, then when we got that right, the drawers slid in but not all the way, and we figured that out, and then it worked.
Problem solving the soft close drawer runner. Looks a bit like a shark doesn't it.  

So there you have it. Flatpack furniture is fun, you'll be surprised by the results, and your brain will thank you for the workout. And the door hinges worked perfectly. 

The kitchen sits snugly in the corner, proud in the knowledge that it was lovingly put together by Jo and Steve

Sunday, 10 July 2016

Windows! Finally

I am not going to go overboard with photos this week.  Just a few to illustrate the process from gib (plasterboard) through to plastering which is basically what happened this week.


Here is one of my absolute favourite features of the flat, alcoves which I asked the builders to make by recessing into the conveniently double thickness external wall (there is a good reason for the double thickness but I can't remember what it is now!) Anyway, we took advantage of it.


We finally got our two renovated sash windows put in, complete with double glazing, and they look amazing.


Alcoves gibbed out, but no window


The window! (and my funky reflective jacket!)


Current state of play of alcoves and window, looking good in the natural light.
The other sash window.  We're pleasantly surprised at how bright the bedroom is, with a garden view
I remembered just as I was heading off to work on Thursday that there was a tidy up job needed in the upstairs bathroom, and that it would be sensible to get the plasterer onto it while he was here.  So the builders quickly gibbed up the corner and that's now well on the way to being tidied up.

Steve made friends with the builders on Friday by bringing them cups of coffee.  I've been buying them crunchies for weeks and they already like him better than me!


The current state of the back of the house.
 Notice the strip of metal running across the back of the house.  That's a correcting piece.  The weatherboards have obviously shifted over the course of the past 100 years and when the builders rebuilt the house from the bottom up they found that they couldn't line up the new weatherboards with the old ones at the top of the house, so they have put in a piece of metal to fill the gap.  The alternative, according to them was take off and replace 10 weatherboards.  I think we can live with this, when it's been repainted....


On Saturday we wanted to paint the outside of the house, but a Wellington southerly was blowing and the temperature was about 9 degrees.  As any painter knows, you can't paint below 10 degrees, or in direct sunlight, or in the rain.  So I did some filling and sanding while Steve started to rebuild the path which had been partially dismantled during the process of rebuilding the side wall of the house.  It's a slow process which is better suited to Steve than me as he spends time getting it right.

"Never thought I'd be doing this again"...
We also went shopping on Saturday and bought the following:
- Tiles for kitchen and bathroom
- plug in panel heater for bedroom
- Door handles
- window hardware
- Undercoat
- Topcoat for living area
- very exciting feature colour for fireplace (watch this space)
- some reclaimed timber for shelving
- etch primer for that strip of metal
- caulk
- paintbrush
- spotlight for feature fireplace
- and we also talked carpets with an installer.


The only major purchases we have left are: benchtop, oven, hob (we've picked these out), washing machine, curtains.  So not too much shopping to go.


Next week we are organising a painting party (inside the flat, so it will go ahead no matter the weather).  If you're in town and fancy helping, please get in touch! We will supply lunch...

Sunday, 3 July 2016

I'm a laminate and proud!

 Quite a lot of progress this week. We've gone from bare framing through to insulation and gib this week, plus a very exciting improvement upstairs...

 In this blog we'd like you to get involved.... Spot the error, and help us pick a benchtop please... see below.

By the way, sorry the photos are not too good.  There is no lighting in the flat at the moment and as it's winter I don't see the flat in daylight during the week so most of these are flash photos.

I've tried to document the progress in photos.

Our reclaimed villa door looking out.  Lovely original reed glass window

The cavity slider door to the bedroom goes in.  It is starting to feel like a separate room
Two different types of insulation here - noiseline for the ceiling (to insulate against noise between the two dwellings) and pink batts in the walls for warmth.

 Ben - here's some insulation news for the sewage stack as you were interested...

Boxing out one of the sewage stacks ready for the insulation
And here's the insulation around the stack
Insulation goes in to the new bedroom (and some gib on the ceiling).

Here's the kitchen before insulation and gib...

Kitchen plus insulation
Kitchen plus gib (oh and a new window to the left)
Gibbing around the new meter box, and before some boxing of the pipework above
So one very exciting thing that happened this week is that the upstairs bathroom got switched over onto the boiler.  When we moved in the whole house was running off a new hot water cylinder in the bathroom.  When we installed the gas boiler we didn't bother switching the plumbing in the main bathroom over because firstly the hot water cylinder was nearly new and secondly it would have left a gap in the bathroom where the hot water cylinder was.  However, we came to realise that the bathroom was running on a low pressure cylinder and the pressure in the shower was clearly inferior to the ensuite shower.  So we decided to switch it over now.  I came back to see this mess in the corner of the bathroom....
What the upstairs bathroom looks like now
Sadly Steve's stirling work building shelving in the corner is now in the skip :-(

However, the pressure in the main shower is now excellent, which is great.  The builders are going to tidy up this corner for us.  

The garden is a builder's yard and is looking very sad.
Grass?  What grass?  
 We had our first real problem with the building work this week.  Let's see if you can tell what it is from the photo below of the bathroom window?
Anyone spot the problem with this bathroom window???
...
....
...

Answers in the comments section please!

And finally, we'd welcome some feedback on our kitchen design.

We've been designing the kitchen this week.  It's quite challenging as it's so small that once you've got essentials like fridge, oven, and sink in, there's very little space left for storage.  Also, our ceiling in the kitchen area is particularly low at only 2m so we can't fit standard height units in there.   Anyway, we've done the best we can to provide as much storage as possible. We've chosen an economy colour called streetlight, which is basically a neutral colour for the cabinetry.

Much to my regret we've decided we can't justify the cost of a stone or acrylic benchtop (around $4500 as compared to around $1200 for laminate).  So we need to pick a laminate benchtop.  The good news is there's lots of choice.  The bad news is that I have violent aversion to anything that looks like fake stone or fake wood, which is most of the laminates.  My preference is for a laminate which says "I'm a laminate and proud!", not "hey I look like I'm stone, but I'm really a fake"....

Anyway, we've shortlisted four colours which meet my requirements.  I'm leaning towards the green as there's no way you'd mistake that for stone, but would it be a bit too radical?

Let us know in the comments section...

Kitchen cabinet colour in the middle, potential benchtops surrounding.

Sunday, 26 June 2016

Walls and Floor. Nothing important then.

After having a few weeks away, we got back to discover the builders had made good progress.  You'll recall that the state of play when we left on May 27 was no walls, no floor, basically, not much apart from a few expensive but unattractive concrete edges.

I got back after two weeks away to find a helpfully large message in the hall (on our shower box!) instructing me not to use one of the toilets and to brush my teeth in the kitchen sink.  A sure fire clue the plumber had been in.


Here are some of the other developments:

I should probably have already highlighted this rather expensive feature of the new flat; a new structural beam, which handily replaces about four or five piles, some of which were a bit borer infested anyway so it's no great loss.
$3000 worth of beam

Bedroom view.  We have walls and floor! (Exposed sewer stack in foreground).


A rather nifty alcove which will one day be where the TV is kept, but for now is a builder's niche

The mess of bathroom pipework is buried under some concrete, shame I couldn't show the process but insulation was laid under the concrete first.
 Here's the current view from the garden; we have a door, weatherboards and we have window frames, but no windows yet. Starting to look like somewhere you might want to live.
The door has now gone in.  This was an internet special - door was sourced from another villa about 2km away.  
 
Kitchen all lined up and the old fireplace has gone, ready to be fitted with shelves.
One of the big expenses of this piece of work was realigning the plumbing.  Our plumbing was previously very easy to access (precisely for the same reasons we're building a flat, because we had a massive atrium under the house!), but it could not be left as it was as it was all over the place and in places it would have left headroom of under 2m.  So the plumber has concentrated the plumbing in two separate stacks.
Below is one of the stacks, which comes from the ensuite upstairs.  All of the pipes (shower, toilet, basin) concentrate into this one sewer stack which will be hidden in the bedroom wall long term.

here's some of the new plumbing.  They had to move the pipework around so that it's mostly in the ceiling cavity.


Ugly canopies

Here is one of my least favourite aspects of the project; canopies.  These are a fire safety requirement to prevent fire from downstairs windows affecting the upstairs but to say they are an ugly addition to the house is an understatement.  Apparently they will need to be installed on all the downstairs windows.  Boo.


Apart from the progress inside the flat we have had to work on a few other things.One of our party fences was pretty ropey and as part of our contract we got the builders to rebuild it.  Not a small job as it also contained a bit of retaining work.  Interestingly, we've probably gained around 3 square metres of (unusable) land from this job as the fence was on around a 45 degree lean to our side! On the plus side we can now walk down the side of our house with ease.
New fence.  Cost shared with the neighbour. 
Other things we've been working on:

- Bathroom fittings - I've now got all the bathroom fittings from our friendly bathroom guy.  He gets everything from China.  He tells me that chrome finishes are only made in China now, because less developed countries don't have the technology and more developed countries won't do it because it is so polluting.  Apparently, China won't open any more factories but has evidently decided the town which our stuff comes from is a sacrificial lamb.  It has to have all its drinking water piped in as it is so polluted.  Not sure what to think about this.  I guess I'll do more research into chrome plating before I buy my next bathroom.

- Kitchen.  Just working our way through options with budget retailers.

- Lighting.  Everything is LEDs now.  Quite a change since we did the kitchen about 4 years ago.  Then we asked about LEDs and were told that the technology wasn't developed.  We have bought a few fittings already.  We will have downlights for main lighting and just a few spotlights in places where required.

- Flooring.  I have a great aversion to vinyl flooring (I'm a snob) and so we are investigating other options, although we may well end up with tiles.

- Weatherboards. I've filled the nail holes for these and once I've sanded them back I can paint the external weatherboards which have been replaced (we took the painting out of the contract to save money).  But you can see from the pictures there are still a few weatherboards to be replaced so I won't paint until they're all in place.