Monday 13 September 2010

Bye bye carpets

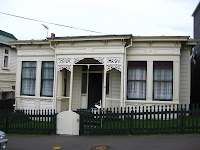
I finally managed to finish my work on the front of the house. Here are the before and after shots showing my work at repairing and repainting the fence. As the next-door-neighbour said - it makes it look "cared for". The whole house needs repainting in the next couple of years but right now that's not high on our list of priorities.
Meanwhile Steve just couldn't wait any longer, the carpets had to go. I am gradually doing the underfloor insulation, have now done about half of it... but September (spring!) is here so Steve got suited up in his asthma defence outfit to rip up some carpet anyway. Ironically the main reason for getting rid of the carpet is to alleviate the symptoms of asthma but the process is an incredibly dusty one.

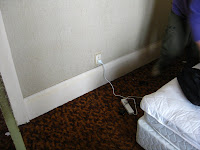
The carpet, to remind you, is a threadbare brown shagpile. At a guess 40 years old. You certainly couldn't buy a carpet like it today!
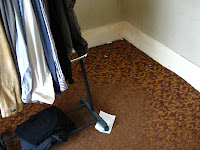
So when taking up the bedroom carpet we discovered not only underlay but also, an even more ancient carpet underneath in an indiscernable and overly stained shade of grey. Difficult to imagine a carpet less attractive than the one on top, but there it was! That is lazy renovation - they couldn't even be bothered to take up the old carpet before fitting the next one!

Under the living room carpet we discovered a nice green hearth from where the fireplace was before being boxed in and some bizarrely poo-brown painted floorboards. I just don't get this. If you're going to paint your floorboards, why paint them the colour of wood?
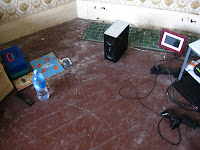
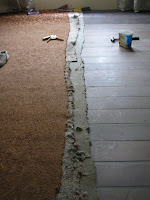
The bedroom revealed some lovely reddish brown rimu floorboards. And a heap of staples to be removed from where the carpet was being held down. I have blisters on my hand from heaving them up.
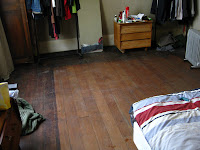
The next job will be to do the sanding. Still got to take up the carpet in the hall and other two bedrooms and then we'll hire a sander and do the lot together. The carpets are history and have started their next life in our basement. Anyone want any old carpet, we've got a bit going begging....?

Steve's final job this weekend was to install solar lights in the garden. It makes the very unattractive yard suddenly look much more like a place you might want to spend some time :-)

Thursday 2 September 2010

Building a bookcase

The extent of my woodworking experience so far in my life has been making a clock in Year9 CDT or whatever they called it. So I went on a few woodwork classes because I thought I would be able to learn how to frame all the souvenirs we got when we were travelling. The first thing I made in the class was a tool box made of MDF, and armed with the powerful knowledge of how to make housing joints I got some reclaimed wood from Brennans the house clearers in Kilbirnie and set to work on my first project - a bookcase. 


The raw materials for the bookcase seen here in our basement, cut up. 
Answers on a postcard if you know what the wood is - we think one is oregon. 


Through July I hand sawed the 2 pieces of really long wood into 2 uprights and 5 shelves, with bits leftover for a top and bottom. Into the uprights I chiselled housing joints 2 cm wide and 1.5cm. After the first one, with 9 left, I was having second thoughts about this approach but ploughed on. They got a bit easier and quicker with each one, but were definitely a labour of love, especially bearing in mind the work they entailed later on when I assembled it all. 


When I'd done one side of housing joints I realised that where I planned to have each housing joint didn't necessary mean they actually ended up there. I realised this after doing the first one on the other side, then I thought it might be a good idea to lie one upright on another and pencil out the remaining housing joints so that they matched with the ones I had already done, rather than relying on measurements. This proved to be slightly harder then it sounds as one of the uprights has a slight bow meaning that they wouldn't sit together properly. 


It was probably about 4 weeks of weekend chisellling and then I got annoyed with slow progress and just spent whole Saturdays bashing away on it. It helped that it rained most weekends in August. 


Jo keeps me company downstairs


Midway through August I lugged it all upstairs as it was time to start assembling. I laid one of the uprights down in the hall and made sure the shelves when fitted into the housing joints were at a right angle to the front and right angle along the upright. Strangely some of the them didn't fit the housing joint either because it narrowed at one end or narrowed as the shelf went into the housing joint. Both were quite frustrating, having to get on my hands and knees and chisel out a better defined housing joint, up to my ears in wood chippings in our hallway. 


When that was done and all shelves fitted, I got the other upright and sat it on top, sliding the shelves into the housing joints. Only  a couple fit properly, and if you got the housing joint at the top to fit, then the other end didn't. So it was a process of elimination to see which one in the middle it was. At first I thought I should sand the shelves down but that took ages, so I resorted to chiselling deeper housing joints. It was complicated by the fact that the beds of the housing joints weren't truly level, with my right angle checks earlier sometimes being aided by me holding the shelf in place, whereas now it was resting however it wanted. 


I eventually got it to fit, so then I took it all apart and glued the shelves to the first upright with the help of lots of wine bottles to hold the shelves upright. When that was dry I chucked the other upright on top and glued that. 


At last, the uprights and shelves are assembled and glued. 
The hall was temporarily turned into a workshop, 
but I wasn't too worried about the carpet.


The bookcase didn't have a top or bottom and wouldn't have looked right without them. I managed to break one of the shelves free from its glue by forcing the top between the uprights, which annoyed me, so I reglued the shelf (very badly) and sanded down the edges of the top. As I was reluctant to bring the sander up to the hallway, I made endless trips up and down the stairs to the basement, as I didn't want to sand too much off so that it didn't fit, and it was never quite enough. 


The bottom was a whole different story. I had measured the distance between the two uprights and cut down the remaining bit of wood to fit. However when I tried to put it in, it turned out the two uprights weren't quite flush, with one in front of the other. Therefore my oblong piece of wood wasn't going to fit. So I had to cut a massive wedge off the long side. Then I had to do the same as with the top and keep going up and down sanding and trying to fit it in. Very frustrating. My main mistake really was to have the top and bottom sit inside the uprights rather then over them, if you know what I mean. 


The top and bottom is on.
  The next step was to cut and attach a piece of MDF to the back for strength. Although with the housing joints and the top and bottom fitted in rather than out, I don't think I really needed this. But I went ahead so now my bookcase will survive a bomb blast or any terrorist attack. 


The MDF was tall and wide and 12mm thick and unbelievably heavy. I had to cut it down to the right size and it proved quite difficult to saw in a straight line without much care and attention. 


The bookshelf stands proud


The original plan
The finished article (and yes,
the top needs fixing to the wall
but it's just like a bus I promise)


So there we are finished. One solid wood bookcase. If I was to do it again I might have done dowels rather than housing joints but they look good. I don't think the MDF back needed to be so thick.

I am taking a break from this now but we have a long list of furniture needs and stockpile of wood offcuts so who knows what we might come up with?