Sunday 30 December 2012

Hello ensuite

 I did want to do a succession of blogs about the ensuite development, but it coincided with one of the busiest times of year and a busy time in our lives too.

To summarise the background situation: we had had the original consent amended to allow us to build an ensuite. This came through in mid November and we quickly got the builders back in.

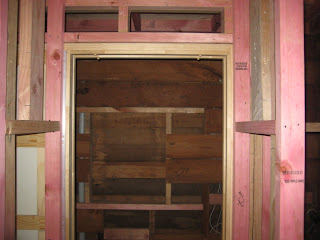
Here's the corner of the room before we started work.  The room is huge - measures about 6m * 4m with 3.6m ceilings, and is actually so big that it was difficult to feel cosy in it.  So the plan was to build a small (1m * 3m) ensuite and two wardrobes in this handy corner. 
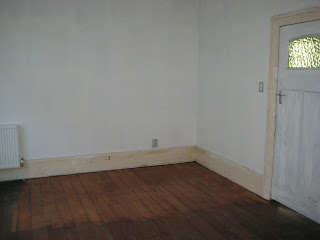
The before shot.  this corner measures about 1.8m * 3m. Note the pre-polished floor...

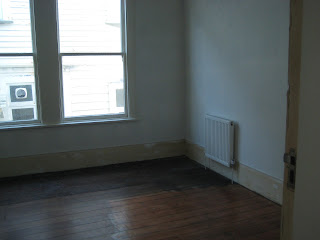
Looking the other way...
 It's worth observing the location of the radiator... too close to the new ensuite.  Annoyingly we (actually Steve) had decided to place it away from the corner near the window, but now this turned out to be too close to the new wall, so we had to move it, at a cost of $100...
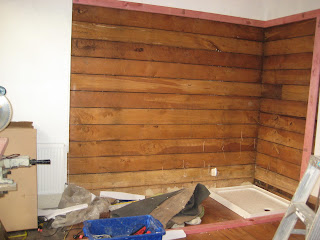
Wall lining stripped away with shower tray in place.

inspecting the new framing
 As the builders started putting in the framing with a false ceiling they were able to create a big cavity above.  The ceiling on the ensuite is just 2.4m so that leaves a full 1.2m cavity to the true ceiling height.  We did briefly consider turning it into a sleeping loft, but as we have no need for an extra bedroom at the moment, didn't progress that idea, but we did ask them to put a light and socket up there for storage.
note the framing for the new loft above - big enough for a bed!

the toilet tries its space out for size
 
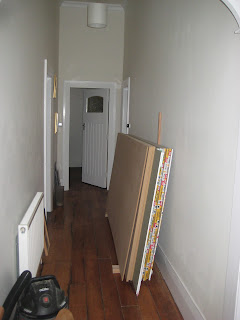
A blast from the past, gib in the hallway again

Just to show the great level of framing the builders do.  It seems superfluous to me but I guess that makes it a quality build

The gib starts to go up
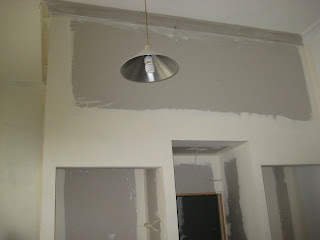
plastering
 We bought a cool mirrored cabinet which the builders installed recessed into the wall.  This is a great idea in a small ensuite because it minimises space above the basin as it doesn't stick out into the room.  It also has a socket inside it so you can charge your electric toothbrush or whatever. 
mirrored cabinet
 With the wardrobe doors we asked for an upgrade on the builder's quote to bifold doors.  The main reason for this was that one of the wardrobes is immediately by the door into the bedroom and a bifold door doesn't take up as much space as a normal door, so the door to the bedroom and wardrobe doors don't collide.  We are pleased with this decision - it cost another $200 ish but it's the upgrades which (from experience) we tend to like.
wardrobe doors go in
 So after about 3 weeks we finally had more or less the finished product, but with Vicki and Steve coming to visit on December 28th we were under the gun (AGAIN) to get the room finished so that we could move back into our bedroom and vacate the spare room.

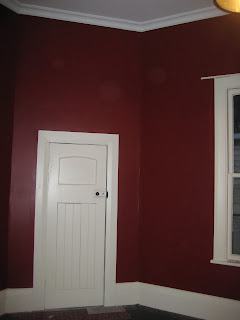
After some consideration we decided to be bold with the colour choice.  Steve consulted numerous possible colour charts and came up with Devil's Backbone - a sophisticated red shade.  I guess it wouldn't work so well in a small or modern room, but we think it looks good.  The painting took a long time to do - with walls as high as ours and a dark colour paint which takes 3 coats to get the correct depth of colour it took us about 3 full days to finish. 
Steve clearly loves painting
 The loft above the ensuite was great but we realised it would be really annoying getting the ladder from the basement each time we wanted to access it, so we asked the builders to make us a simple ladder attached to the wall.  This cost another $200, but I think it was well worth it.


the closet all nicely painted

the mirror on the sliding door cost us another $200
 Steve was very naughty with the paint colour inside the ensuite.  I had the veto rights on the colour but Steve was in charge of buying paint and bought a more purply shade than I had chosen.  Mine would have been more grey, but on the whole it's not too bad....
new shower and basin

mirror cabinet
So we are now all finished in theory.  There are though a couple of outstanding problems. Most importantly we have a leak under the house.  The builder is away at the moment so we can't get it fixed, so it's back to shower no. 1 for the time being.  I haven't paid the bill in consequence, but it will amount to around $16k in total - about $1200 for the bathroom furniture. maybe $400 in paint, $300 ish for lighting and the rest for the builder.  
 
On the whole though, we are quite pleased with the end result.  It was great having a second bathroom with guests staying.  The wardrobes are not perfect as they are just boxes - without drawers it makes it difficult to select items.  So I might purchase a few trays to fit inside them, if such a thing exists.  We have no longer got enough wallspace for chests of drawers so they will have to be enough one way or another!
 
The loft space and ladder is probably my favourite thing, it means we can finally clear up some of the other parts of the house where we have things like boxes of cables and wrapping paper cluttering up the place.  I also really like the paint job - Steve was responsible for walls and I did the cutting in.


Sunday 2 December 2012

Paths and Tables

So back in the day the stairs to our house looked like this.

Notice the hefty treads, still in good nick after 100 years outside. When the stairs were demolished I asked the builders to keep them as I thought I'd think of a good use for them.  There are 9 of them, probably about 4kg each, about 900mm long by about 250mm wide and according to the builders, made of Oregon.  I suddenly had a brainwave - I'd turn them into a table for the deck.
The treads sat under the house for months before I managed to persuade Paul to help me build the table.  I wasn't very confident starting by myself especially as we had to cut out the legs which needed a rotating saw.

Anyway with Paul there to help we were quickly cutting up the wood.  I bought some pine posts for the legs, and for the rest of the frame, we had timbers from the demolition of the back door lean to (probably rimu, not 100% sure.)  The timbers from the house had lots of borer holes in (do you think I should be worried that structural timbers in the house have borer!?) so I painted them with anti borer stuff before we started.

Paul helps with the cutting while Sheryl does some weeding
 We discarded one of the treads because it would have made the table too long for the deck doors to miss it.
The chopping up took ages because the reach of the saw is probably only about 5cm, but the posts we were cutting to make the legs were 10cm * 10cm, so with two different cuts I had to sand down the cuts to smooth it out.

The wood all cut but not screwed together
 It then sat like this for a few weeks while we went off on holiday, before I got around to screwing it together.  I had bought some hefty bolts which said they were self tapping, but thought I'd pre drill the holes anyway.  In the event our $30 drill/screwdriver was not strong enough to screw the bolts in, even with the pre drilling (smoke was coming out of it!), and by hand it was such hard work that I got blisters on my hands.  But luckily for me Phil the builder was in doing the ensuite and he had a super powerful drill which finished the job for me.

You can just see the brackets I used to attach the table top to the frame beneath.  The treads are so heavy that there's not much danger of  them coming off unless you pick the table up by them, so the brackets are just to hold them in place really.
Finished article

So here is the finished table.  It measures 1.6m *900mm.  We may still sand down the top but I quite like the unfinished look.  Definitely need some better chairs though!  It is so heavy that if there are any slight uneven finishes on the base of the legs, you can't tell because it's so well weighted down.  It takes two strong people to move it so no chance of blowing over in a Wellington gale!  Cost was around $100 for the posts, brackets and bolts.

So while I was finishing the table, Steve was working on the path.  It is a slow process which we've been working on for about a year and half using bricks from the chimneys we've pulled down.

Mid construction
 Steve works in a very scientific way, with levels, and string lines.  You lay the bricks on a bed of sand.  I think a compacting machine for the sand before laying the bricks would have saved all the hammering in of bricks Steve was doing.  He kept hitting his thumb with the rubber mallet!
hard at work at the door to the basement

The path is finally finished!
 This is immediately after the path up to the steps was finished, the grey bit under the steps is where the sand covers the newly laid bricks.
The view back to the street
 In total we (mostly Steve) built about 30m of path, using around 1000 bricks.  Cost was no more than about $200 in sand, although at $1 a brick it would have cost us $1000 in bricks alone if we had bought them.  We still have over 350 left - brick pizza oven?!?
Relaxing on the deck in the morning sunshine
Our deck is south facing so gets morning and evening sun in the summer months.  Best of all, it is sheltered from the prevailing northerly wind so we often find it warmer than anywhere else in the garden.


Tuesday 16 October 2012

Working on the garden

This should really be Steve's blog, but we might wait a very long time for an update if he was left in charge.

So to recap - the builders left the garden looking pretty ropey and more or less destroyed what lawn we had.  Then, we recently smashed up the concrete in the back garden that was remaining after our first bout of concrete smashing, and had a titanic struggle with some crazy plants.

Well, since then we've (mainly Steve) been working on turning the backyard into a garden.  We've already done loads to it - planted a row of trees on the back fence, put up loads of trellis, added the deck of course, and now that the concrete is gone we have the opportunity to start planting the main part of the garden.

After our chimneys came down we had loads of bricks in the garden - here's the pile of them which we demortared a few months ago and stacked neatly -over 900! Until the bricks are gone there's a big part of the garden that we can't redevelop (because it's covered in bricks!)


big pile of bricks

The trees along the back fence are having mixed success - the maple and robinia are growing slowly, but the coprosma and pittosporum, from very small plants are now both over a metre.  The pseudopanax had a greenfly attack which held it back a bit but the star is the Akeake (dodonaea) which has added a metre at least in a year and is now about 2.5m and doing a good job blocking the sight line to the rear neighbour's lounge!  It's just out of shot to the right of this picture.


We did get 100% more flowers on our kowhai this year which was cool - a total of 4 from a base of 0 last year...  Probably not enough to bring the tuis in just yet.
three lovely flowers on the kowhai

We have put up quite a bit of trellis on the eastern boundary and the clematis, (which was one of the very first things we planted in the garden so has had nearly 3 years growth), gave us a great display of flowers in September/October.  You can also see the piles of gravel and dirt occupying other corners of the garden. 

clematis doing its thing.  Jasmine to the right doing its best to keep up
But back to the bricks.  We previously did quite a bit of work on the path down the side of the house - built a full 13m of it in fact starting around about this time last year over the course of a good few months.  The plan was always to extend the path round the back of the house but obviously we couldn't do this until (a) we had more bricks and (b) we had less concrete.  Strangely we don't seem to have ever written about this so here are some progress photos.  The path down the side of the house used to be dirt, with a river down the middle when it rained.  Building paths is a slow process and 90% done by Steve - my job was mainly demortaring bricks.

Anyway by the time builders were in we had built 13 metres down to the bottom corner of the house.


working on the path down the side of the house


the final bricks before the builders came
Since the concrete came up Steve has been beavering away on the path at weekends and we are getting there.  Once we had turned the corner (literally) he was then able to implement phase 1 of the back garden plan - garden bed.  So armed with a list of plants we went off to the garden centre and came back with the selections you see below planted into Steve's carefully designed bed.  


On the left of the pictures is the start of my fernery.  It almost never gets sun as it's on the southern side of the house so I will be planting lots of lovely ferns.  The shot below is pretty much exactly where the fig used to be.


Doesn't it look good?  Obviously we're still missing grass to the right of the bed, but suddenly we have the makings of a real garden.


 There's a lot more path to go and obviously a lot more garden too.  So watch this space...


Tuesday 11 September 2012

Collateral Damage

So I just had another crazy weekend of DIY.  I hate the weekends where you hire equipment because you're really under the gun and have to finish the job in two days because the equipment is going back on Monday. 

My mission was the hall, laundry and ensuite (more on that later) floors which are made of matai.  It's quite interesting to look back on what the hall was like because we've transformed nearly every aspect of it.  I think the only thing still left is the lampshade.  Anyway.  What was still left was the floors.  After we pulled up the horrible carpets we discovered that most of the hall floors were painted mud brown.  (Why?!)

The doorway originally - threadbare carpet, tiled ceiling, flaky paint, textured wallpaper, chipboard panels around the door.
 Here's a shot of the floors just before I started sanding.  Brown paint with paint spots.  But the walls and ceilings are much better since we re-gibbed and re-plastered and painted.
the repainted hall with new doorway but brown painted floorboards

the hall door now with leadlights and repainted, but still with painted floorboards
 So I hired a drum sander and an edge sander for the weekend.  It ended up costing about $275 including the sandpaper.  I used much less sandpaper than I thought I would, considering that I had to strip off paint in the hallway.  This picture shows the process.  I also stripped off the corner of the main bedroom because the long term plan is to turn that into an ensuite with wooden floor (the rest of the room will be carpeted) so it was sensible to strip it at the same time.
In total I used five sheets for the drum sander - 2 coarse, 2 medium, 1 fine, and about 12 for the edge sander - this for the equivalent of about two large rooms.
in the process of sanding

with the drum sander in the laundry
 Here's the hallway stripped and unvarnished.  I had to use a detail sander for the corners (fortunately we had one).

stripped floorboards with no varnish

matai floorboards now with varnish

facing the other way
So doesn't it look nice.  Shame about the collateral damage...
I managed to destroy two extension cables by running over them with the drum sander (difficult to avoid when the machine drives itself).  Fortunately I didn't get a shock.
I also stupidly managed to cut through the PVC pipe connecting one of the heaters with the edge sander (in the UK those pipes are made of copper so I wouldn't have been able to cut through it, but here in nz, flimsy old pvc).  Water spurted out everywhere and the central heating stopped, obviously.  Fortunately it was a quick fix and we managed to get the plumber in on Monday... but all in all my DIY efforts may not have saved us that much money!!!
Plus I have backache from all the sanding...

The hallway looks good - the sanding and varnishing has really lifted it and made it look really welcoming finally but I can see the flaws, (not to mention the collateral damage) - particularly a few places where the drum sander rested for a fraction too long in one place, despite me knowing not to do that.  It is also not as smooth as the kitchen professional sanding job, which could have been the water-based varnish I used.  Difficult to say.  Anyway, I probably saved about $1000 by doing it myself but there's no doubt that the professionals do a better job, and it remains to be seen how much the plumbing repair will cost....

Sunday 26 August 2012

Steve and the beanstalk

We've been doing a spot of landscaping recently.  When we moved in our quite small (13m *7m) back garden was mostly concreted.  You can see the extent of it in the photo below.  Low maintenance but not very pretty.
A shot of the garden as it once was, wall to wall concrete
 Back in 2010 we dug up half the concrete, leaving the rest because I think we wanted to wait until we'd finished the big construction work before digging up the rest - plus it was too much for one small skip.

Digging up the first half of the concrete in Dec 2010
 Of course, the glorious day has now arrived where the building work is -ahem- finished.  More on that in future blogs... but the majority of it is done so we were ready to start landscaping in earnest.  We had another smashing Saturday with a cleanfill skip out the front and Sheryl, Paul and Maggie all turning up to help with some destruction.
Sheryl, Steve and Paul vent some aggression
 Actually digging up concrete is quite a quick (but very enjoyable) job, but there's a lot of carrying of concrete and rubble to and from the skip so the extra labour is very welcome.  We also had all the waste from the bricks which came from our destroyed chimneys - quite a pile of mortar from the de-mortared bricks and broken bricks to dispose of as well as concrete.
Maggie the murderer  kills some plants
 Once that was done we set to trying to get rid of some of the plants which are inconveniently located right where our path to the basement and deck stairs will go.  Maggie was getting into it: "Die plant, die" seemed to be quite a successful mantra.
The demon fig
 We pulled up a couple of fuschias which were right under the deck and definitely had to go.  But the fig which used to take up approximately 1/4 of the garden just would not budge.
A typical working party, one working, three watching
The fig was located pretty close to the house and was a really healthy plant reaching 2m in each direction at one point.  Great shame to get rid, especially as the silvereyes really liked the berries, but our garden is too small for such a huge plant, plus it was too close to the house and in danger of undermining the foundations, and the pathway to the basement really needed to go right over where it was located.  Despite the collective efforts of the group we had to concede defeat though - it was just too big.
Our second skip full of cleanfill
This was the satisfying sight on Monday morning - skip full of rubble, broken bricks etc.  Only cost $190 to hire the skip and it is well worth it - imagine trying to take all that to the tip in your car.
I did take all the green waste from the fuschias etc plus the weeding that Sheryl did (she couldn't resist attacking our borders) to the tip and it completely filled the car.  The only spare space was my driver's seat!  Amazing how bulky it is.  The council mulches it all and turns it into compost which they sell back to residents - what a fantastic scheme - they charge you to accept it then sell it back!
At last! Steve chops down his beanstalk. I mean fig.
After a weekend away in Queenstown we had another weekend of landscaping.  We bought an axe specially to chop back the fig and after a couple of hours finally got it free.  Here is a shot of Steve with his trophy.


Next the plan is to extend the brick path round the back of the house to the basement door and deck stairs.  We've marked it out and once the ground is levelled out (another big job) that will be our weekend job for the next few months.  Meanwhile we face a rather muddy walk to get to the basement.