Sunday, 11 December 2011

Leadlights!


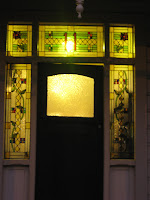
So I have been working hard for a year and a half trying to deliver my leadlight project. I've already described the process so this is just the "look what I did" blog.


A reminder of the original concept: And this is what we had before. Someone has replaced top right and top left with chipboard panels and painted the centre top glass a khaki green colour (why?!?) So light in the hall was a bit limited.Here's the view from the outside. The leadlight teacher reckons it was once all coloured glass panels which probably became broken and were never replaced.
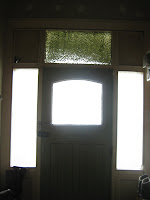


So after 1.5 years I finally finished! Here is Greg the leadlight teacher having removed all the glass and chipboard from the door. Much more light. The chipboard panels top left and right were full of borer.

Leadlight 1 goes in.


And the end result - by day from the far end of the hall. Lets in much more light which is great.
By night viewed from the outside:And from up a ladder:
So overall this is about 120 hours work. I got much much faster as I went along and if I did it again I could probably do it in about 80 or so. Greg says he'd knock it out in 40.


The toughest panels were top right and left, the flowers were really difficult to get to fit together. The side panels were also challenging but I had got more skilled by then I think. Though we did smash a couple of the internal glass panes after the leadlight was put together by being too rough with it which wasted a lot of time in fixing them.


Total costs:


Leadlight courses: 6 * $180 = $1080

Lead: about $350

Glass: $460

Tools, stationery, cement etc: $130

Solder: $60

Total costs: about $2080


Greg says to commission this set would cost about $7000 so considerable saving by DIYing. But then again my time is precious too.

I may still do a matching panel for the door, but haven't decided what it should be yet. Let me know what you think!

But first I want to have a little break and focus on wallpaper stripping. :-)

Thursday, 1 September 2011

Airfoam-tastic

Here are some photos of the wall insulation we had done - or rather, the patched up holes left behind.

iHaving insulated the loft space and the underfloor it was just the walls left to do and there only really seemed to be three options -

1) Remove the gib, insert batts behind, then reinstall gib and replaster
2) Install polystyrene sheets on the inside of the external walls and plaster over the top (not sure what happens to plug sockets though so that wasn't really an option
3) Airfoam - a cavity wall insulation inserted into the walls In the end it really was a no-brainer - the re-gibbing, though not difficult, would become very expensive after a while - each sheet of gib costs $25 and covers 1.2m *2.4m - with 3.6m high walls it doesn't take much to work out that a single wall would probably cost about $500 to regib in gib board alone, but then you add the labour and the batts and the plastering... Also, our house has what's called sarking, or horizontal boards behind the gib, which add insulation, and are very useful if you want to fix anything to the wall - and to fit batts they'd all have to go.


So we went for Airfoam which seems to be the only provider of cavity wall insulation in NZ. Because our house (with the exception of the bathroom which we insulated anyway) hasn't been decorated we elected to have the foam squirted in from the inside - this reduced the cost a bit (presumably because it wasn't necessary to hire scaffolding).


The process only took a day, and cost $4000. As you can see they drill holes between each joist and squirt in the foam which starts at the consistency of shaving foam, before firming up over a couple of days. The company then patch up the holes left behind ready for repainting.

After it was done we were supposed to leave all the windows open for a month to ventilate and allow the foam to cure! Which was a problem as we had it installed in the middle of winter so we didn't ventilate much, but lived to tell the tale.


Anyway a month or two since it's difficult to quantify the effect, but basically unless we're in the middle of a "polar blast" the house is warm enough just with the electric heaters, so I think that's a notable improvement. We definitely won't save on heating bills, but just making the house a nice temperature was always the main goal so we're pretty happy.


Sunday, 12 June 2011

Leadlights 2 & 3 - plus some creative gibbing

Three or four projects to report on here. I probably should write lots of separate blogs. But I can't be bothered.


First up - leadlights 2 & 3. Much harder than no. 1 because I introduced curves. Boy does that make it more difficult. I'm not sure why, I guess it's just easier to make little mistakes. Anyway these babies took me 1.5 courses, with almost all work being done during the course itself. If there had been no curves I reckon I could have done them both during one course.


First a reminder of the concept:
Second here are the two top left and top right leadlights... Quite pleased with them, but now I move onto the sidelights, each is 3x bigger than these - could take me a while, but I'm still aiming to finish by Xmas.


Next up - ceilings. This is what they all (apart from the oil stained kitchen ceiling) - looked like before - horrible chipboard panels, like an office ceiling.


First off we stripped them. This is difficult as the ceilings are 3.6m high and on our biggest stepladder we can only barely reach them. So we hired a portable scaffold over a long weekend to help us out. Underneath the panels is boarding which is handy as you don't have to rely on hitting the joists to screw the gib in.


With the scaffold we also hired a gib lifter. It was supposed to lift the gib 3.6m, (essential as the sheets are very heavy and it's almost impossible to both lift them and screw them to the ceiling). But the lifter only went up 3.4m. Which was a bit of a nightmare until we realised we could put the lifter on the scaffold, then away we went. The lounge ceiling now looks like below - a bit of a patchwork until we get it plastered. We still have to gib both bedrooms and the dining room, but during the long weekend we managed to strip the lounge and bedroom ceiling and gib the hall and lounge.

This weekend we moved back onto the "hole" as we affectionately like to call it.


First up I installed dwangs (noggings to those in the UK, or cross braces if you have no knowledge of building talk). They're used to provide more wood to screw the gib into. Next up I installed the doorframe that we had lying around from the bathroom project. I spent about 1/2 an hour trying to separate the door and frame. They just wouldn't come apart. I was trying to lever them apart with a big screwdriver and whacking them with a big rubber mallet. And then I realised there was a screw holding them together. Luckily there was no-one around to observe my stupidity...


Building paper and insulation followed, and I also installed the wiring for the light in the loft, to save the electrician a job (he'll do the tricky bits though).


Steve did his magic with cement to fill in the recesses in the floor. It's still looking pretty messy but should be a bit more level in future.

And this is how it's now looking, partially gibbed, with a floor and a door frame.... we're getting there!


Sunday, 17 April 2011

Bathroom Renovation - Weeks 5 - 8

So I got a bit slack with the blogging. We've been busy with tennis and birthdays (see below).

Anyway, four weeks to the day after the previous bathroom "suite" was ripped out we got the new one. And a few days after that the electrician came in and installed the lights, underfloor heating and extractor fan - see below. The fan is particularly exciting as it has a humidity detector and opens itself up when needed (when you're in the bath or shower).

Yes we felt brave and went for a red ceiling

Towel rail - hooked up to the thermostat with the underfloor heating so we can put it on timer. The underfloor heating is a bit disappointing as it doesn't seem to get really hot, but we're still fiddling with it.

Here's the new toilet. It has a "soft-close" seat - if you drop it it closes gently (no excuses for leaving it up!) And in the corner is the hot water cylinder - Steve is still working on boxing it in and building some shelves.

Shower - slightly disappointing as the pressure valve we installed seems to have reduced the pressure. But very spacious - 1m by 1m, and the shower head is gorgeous.


The Starship Enterprise shower

New bath. Not disappointing at all. and has a rim all round it you can put bottles on. Awesome.

We are still looking for a stool we can put between the bath and shower for the plant to rest on.


Mirror. Tom the builder made the frame, and I got the mirror from my leadlight teacher who works for a glass fitters at a bargain price. It is particularly good for highlighting every last wrinkle - I've always wanted a mirror with lights around it.
Oh yes and meanwhile Steve had his birthday. I made this gorilla cake. It was quite yummy.
So the bills are now all in. This is the total summary (including GST (VAT to those from the UK)).


Builder's demolition + reconstruction of doorway - $2000

Fixtures and fittings - $7500

Tiles $1500

Builder $2600

Tiler $2400

Plumber $4000

Electrician $3500 (of which about $1000 was works elsewhere in the house).

New window $400

Sundries (paint, wood, insulation etc.) $450


Total: $24,350 or $23,350 excluding the electrical work outside of the bathroom.


Money well spent? Our friend, an estate agent, says you never lose money doing your bathroom, in fact you more than gain what you put in. That makes our house now worth at least $557,350... in theory.

Lessons learned:


Spend a bit more on your fittings than the minimum. The things we particularly like are the luxuries - the fan is high quality (we bought it on the internet), the soft close toilet seat is steve's favourite. The shower niche is just great.

Make sure your tradespeople understand exactly what you want before you let them loose. We learned this the hard way (although to his credit the plumber did sort it out eventually).

We saved a bit by doing the painting and insulation, and Steve is making the shelving. We could have saved more by doing the demolition ourselves.

But not having another bathroom really dominated our actions - for example doing the tiling ourselves would have meant no bathroom for even longer. If it had been a second bathroom we probably would have tried to save money more than time.


And finally - it was an endurance feat but it's pretty nice having a lovely new bathroom. Come and visit it sometime!

From this:

To this:


Sunday, 27 March 2011

Bathroom Renovation - Week 4

So Andreas the tiler finally finished on Wednesday and even the plasterer said he'd done a great job. The delay was all due to waiting for cement and waterproofing to dry and there was no way we could have done it faster - tiling took about 9 days in total. The easy niche looks really good with the aluminium border. Andreas just had enough of the "urban green tea" wall tiles which was lucky as we bought all that were available at the end of the line. Steve spent hours deciding how to arrange the feature glass tiles and eventually settled on this arrangement. It reminds me of toothpaste.... The plasterer then came in. His job is to plaster up the lines between the gib board and the nail holes. Damon was a cheerful chap who was a bit nocturnal, showing up about 5pm to start work. He was pretty reliable though which is the main thing. He finished on Saturday at lunchtime and we then moved on to painting. We decided to paint now as it is much easier before the bathroom fittings are installed.
So mid way through the painting, the base coat is on, and we're onto the top coats. That's me getting more paint off to the right.

We'd chosen to use the colour of the wall tiles for a couple of walls and the red from the glass tiles for one wall and the ceiling. A brave choice, but we think it works....
This is an old chair I bought and repainted the colour of the other glass tile. Mum and Dad had the seat re-upholstered. Eventually this will be where you leave your clothes when you have a shower.
Finished paint job! It looks better in natural light, and as you can see, we are still waiting for our electrics.

We have the plumber lined up for Wednesday. With any luck this weekend will be the final one without shower, toilet etc. It will be four weeks since we started on Tuesday and we are getting quite fed up of living in a construction site. But I'm not counting on it!

Sunday, 20 March 2011

Bathroom renovations update

Andreas the tiling man put down the levelling compound. It took a couple of more days to dry than he expected, particulary in one corner. Then he painted 2 layers of thick grey gloop called waterproof membrane, that smelt like fish. There's no way the water is going to get through our floor!!! 

By this weekend (20th and 21st March), the waterproofing had dried and Andreas came in to start the tiling. It felt like a landmark occasion. 

Andreas starts the tiling, The tangle of wires to the left includes an alarm which will go off if the underfloor heating circuit gets cut during the work. On the far wall is not a window without a view, but the Easyniche wall recess for putting shower stuff.

The tiles are laid, but without any grouting. On the right are the tap connector and water pipe for the bath - the tap controls and the spout will be mounted on the wall 
This week we hope to get the walls tiled, the ceiling plastered and the walls painted - all of which gets us pretty close to finishing. Perhaps a week more after that? Meanwhile we continue having showers wherever we can find them - work, sports clubs, the next door neighbour...

Monday, 14 March 2011

Bathroom Renovation - Week 2

So after two weeks the bathroom is starting to take shape. We came back from a weekend away to find that the builder (who'd promised to work all weekend) had done very little, but had drunk the beers we'd left for him! Anyway, he made good progress on Monday and on Monday night I was able to install the wall insulation. I actually bought roof insulation (R1.8, 95cm thick) as it was much cheaper than wall insulation - it only cost $100 to do the two walls we had exposed in the bathroom.

I had decided to glue building paper to the joists to provide a bit more of a weatherproof seal between the weatherboards and the insulation. This is not an orthodox procedure but can't hurt, and should provide a bit more wind-proofing. Only problem was the joists were so dusty the glue didn't stick so I ended up just wedging the paper in place.

For the most part the batts just stayed in the wall without me needing to fix them in there which was helpful. I managed to do the building paper and the insulation in about 5 hours (insulation alone would have been very quick).

Nearly finished!

Tom the builder then installed gib board over the insulated walls. He did a stirling job installing our easy niche - a feature of the shower which is fitted into the tiled shower wall. The plastic niche cost $200. Here you can see it fitted into the gib.
Tom spent a day renovating the existing sash window in the bathroom. It was pretty grotty before because the shower was fitted right into the window frame, which had led to rotten sash cords and mouldy frames. The top of the sash is painted in but it is so high off the ground we can't reach it anyway. The bottom sash now opens though.

This is the new window I had made for $400. Tom then said he could have done it for $200! Typical. But at least it no longer has louvres which let the wind and rain through.Both of the windows with new framing.
So Tom finished his gibbing and window-ing on Saturday (he was much more effective with us there watching and no beers on hand) and on Sunday we laid out the underfloor heating cable. This is not a difficult task but you can't cut the cable so you have to lay it out precisely to line both ends up with the thermostat lined into the wall. You tape down the corners and then the tiler lays a levelling compound (type of cement) over the cables to make a smooth surface for tiling.
This week: tiling. I think we'll have one more week of no bathroom facilities but with any luck should have a toilet and bath by next week. Fingers crossed....